- Narshe
- World Map
- Figaro Castle
- World Map
- Figaro Cave
- World Map
- South Figaro
- World Map
- Mt. Kolts
- World Map
- Returners' Hideout
- Lete River
- World Map
- Hut
- World Map
- Imperial Base/Doma Castle
- World Map
- Phantom Forest
- Phantom Train
- World Map
- Baren Falls
- World Map
- Mobliz
- World Map
- Crescent Mountain Cave
- Serpent Trench
- Nikeah
- South Figaro
- World Map
- Figaro Cave
- Lete River
- World Map
- Narshe
- World Map
- Figaro Castle
- World Map
- House
- World Map
- Chocobo Stable
- World Map
- Zozo
- World Map
- Jidoor
- World Map
- Opera House
- World Map
- Vector
- Magitek Factory
- Esper World
- Airship
- Jidoor
- World Map
- Narshe
- World Map
- Imperial Base
- World Map
- Cave to the Sealed Gate
- World Map
- Imperial Base
- Airship
- World Map
- Vector/Imperial Castle
FFVI Any% Glitchless Notes
Don't use Chrome
This guide does not work correctly on Chrome. Chrome has an unresolved bug that prevents this website from working on smaller screens. Please consider using any other browser (like Firefox); they're all superior.
Welcome to my Final Fantasy VI notes for the Any% Glitchless US category. This is a collection of strategies, instructions, and tools that I collected from different sources. When I decided to start running this game, everything was scattered, and I was spoiled by MrTyton's FFX Any% guide. I wanted to make something similar, and this is my attempt.
This category of speedrun uses the US version of the game, which is titled Final Fantasy III. There are two revisions of this game, informally known as 1.0 and 1.1. In 1.1, the optimum equipment bug and the Sketch bug were fixed. Seeing as this is a glitchless run, either version will work.
About this route
This route is a combination of what I've seen from Dyne_Nuitari's world record (plus their advice) and the notes by Odinsfall and TheSabin. This route does not use a step count currently, but this guide will eventually be updated to allow choosing if you want to use the step route.
Emulators
Certain emulators are inaccurate and are not allowed for use in this category. In particular, ZSNES is banned. I recommend using BizHawk. Emulators should be run in accuracy/compatibility mode.
In addition, please take a checksum of your ROM to make sure it is correct. As long as any of the below checksums matches your ROM, you have a good version.
Final Fantasy III (USA).sfc
MD5  e986575b98300f721ce27c180264d890
SHA1 4f37e4274ac3b2ea1bedb08aa149d8fc5bb676e7

Final Fantasy III (USA) (Rev 1).sfc
MD5  544311e104805e926083acf29ec664da
SHA1 057ada1c641e3e0b3ca34e6e4f4eb1b05a87143a
In order to ensure that you get the right encounters at the right time, you will need to manipulate your starting encounter seed. Doing so requires a save on the world map with zero threat (saved directly after an encounter without moving). There is a calculator below that will tell you what steps to take to manipulate your seed. Click on the title of the calculator section to expand it.
After manipulating your seed, you should watch the cutscene at the title screen before starting a new game. If you do this, starting a new game will skip the cutscene, starting you at Narshe immediately.
This section will outline some important concepts and knowledge for the run.
ATB waiting
An important trick used throughout the run is ATB waiting (also called wait tricking). I highly recommend watching the video below to see it in action (focus on the red bar on Ultros).
This route uses the "wait" battle mode, in which friendly and enemy ATB is paused whenever a submenu is open (and other commands like Steal, Blitz, and Jump, but not Fight or SwdTech). This means that the enemy's ATB is going up during your attacks. In order to prevent this from happening, you can open a submenu to pause the ATB. This allows you to have more turns than usual.
Fleeing
When holding both the shoulder buttons (L+R), all characters will attempt to flee. Each encounter has a value that each character must reach in order to successfully flee, and the value is determined by the type of enemy and the number of enemies. In general, each enemy counts for 2, but some count for 6.
The game checks to see if fleeing is being attempted every two seconds. Each character has their own flee modifier, which is added to their total flee value if attempting to flee when the game checks. Assuming the encounter is escapable (e.g., not a boss battle), a character will flee when their flee value reaches the encounter's flee value, they have full ATB, and no actions are happening.
This system could be visualised as a gauge that goes up at a set rate for each character while fleeing each time the game checks. When full, a flee is possible.
Certain fights or actions will be marked as Buffer Flee meaning that you should attempt to flee during an action. This increases the flee "gauge" but prevents actually fleeing, as encounters cannot be fled from during an action. This fills the flee "gauge" and allows you to escape at a later point.
Each character's modifier is listed in the table below.
| Character | Modifier |
|---|---|
| Gau | 5 |
| Locke | 5 |
| Mog | 5 |
| Relm | 5 |
| Shadow | 5 |
| Celes | 4 |
| Edgar | 4 |
| Gogo | 4 |
| Terra | 4 |
| Sabin | 4 |
| Setzer | 4 |
| Cyan | 3 |
| Strago | 3 |
| Umaro | 3 |
| Kefka | 5 |
| Biggs & Wedge | 4 |
| Leo | 3 |
| Banon | 2 |
Slots
This route only uses Setzer's Slots ability once, during the Cranes fight. The only ability used is Chocobop, which is not affected by Slots RNG. To get Chocobop, you must land on the chocobo for the first wheel, then hold A. It is impossible to get anything but Chocobop if the chocobo is the first wheel.
Landing on the diamond works the same as landing on the chocobo; it's impossible to get anything but 7-Flush once you do. This is a minor damage loss, but it is still significant.
I recommend practising this before doing a run. Note that you can pause the game during the slots to help timing.
TODO: info about defend
Use this calculator to determine how to manipulate your encounter seed to your desired seed. Most speedruns use 244 for the seed (including this one).
- Set your , then load a save that has zero threat (saved just after an encounter without saving).
- Count the number of steps until you get an encounter, then insert that into the box.
- Reset, load into your save, then count the number of steps again. Insert that into the box.
- Reset, load into your save, then count the number of steps one more time. Insert that into the box.
- Reset. Follow the instructions that appear below.
Menu
Battle speed
6
Message speed
1
Cursor
Memory
Go north until a forced encounter.
Encounter Guard x2
Terra
Bio Blast
Vicks & Wedge
Flee (hold L+R as soon as Bio Blast starts)
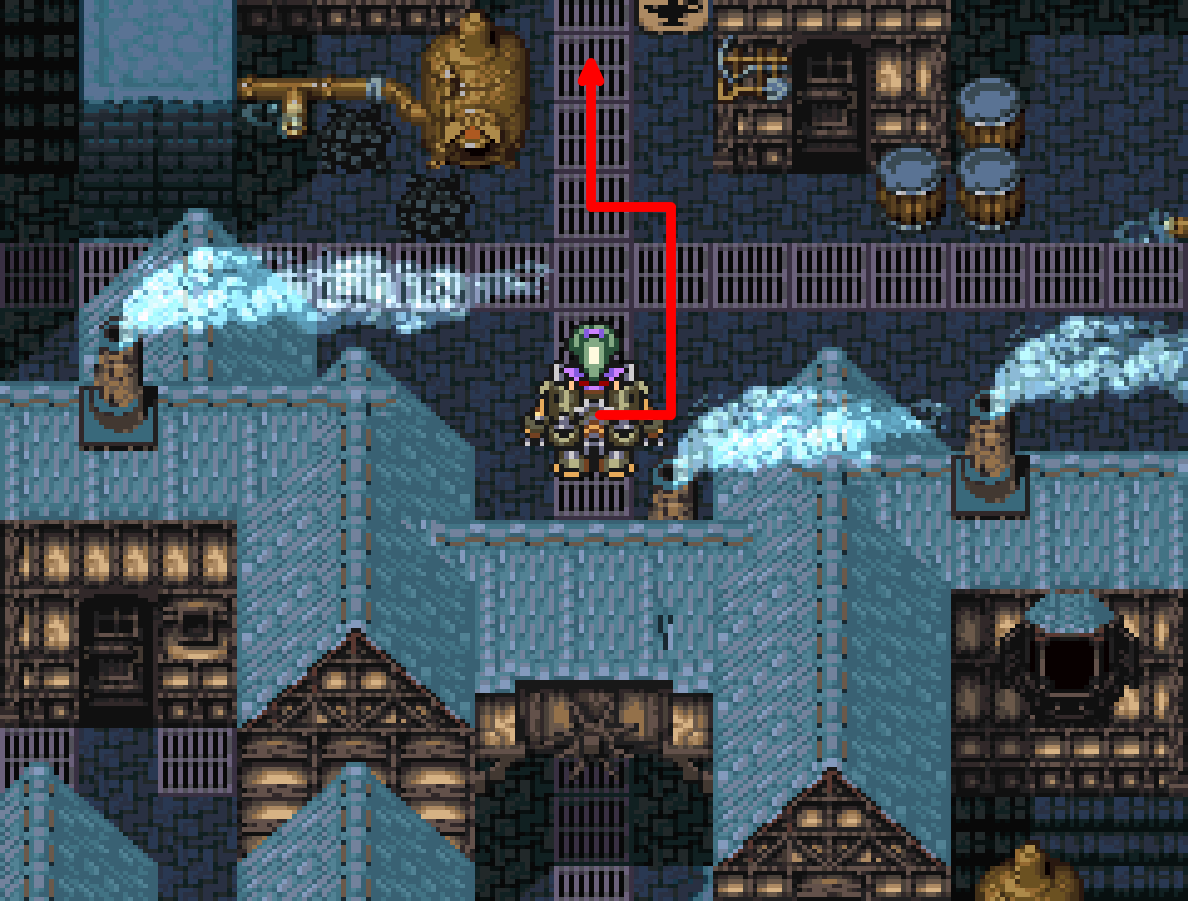
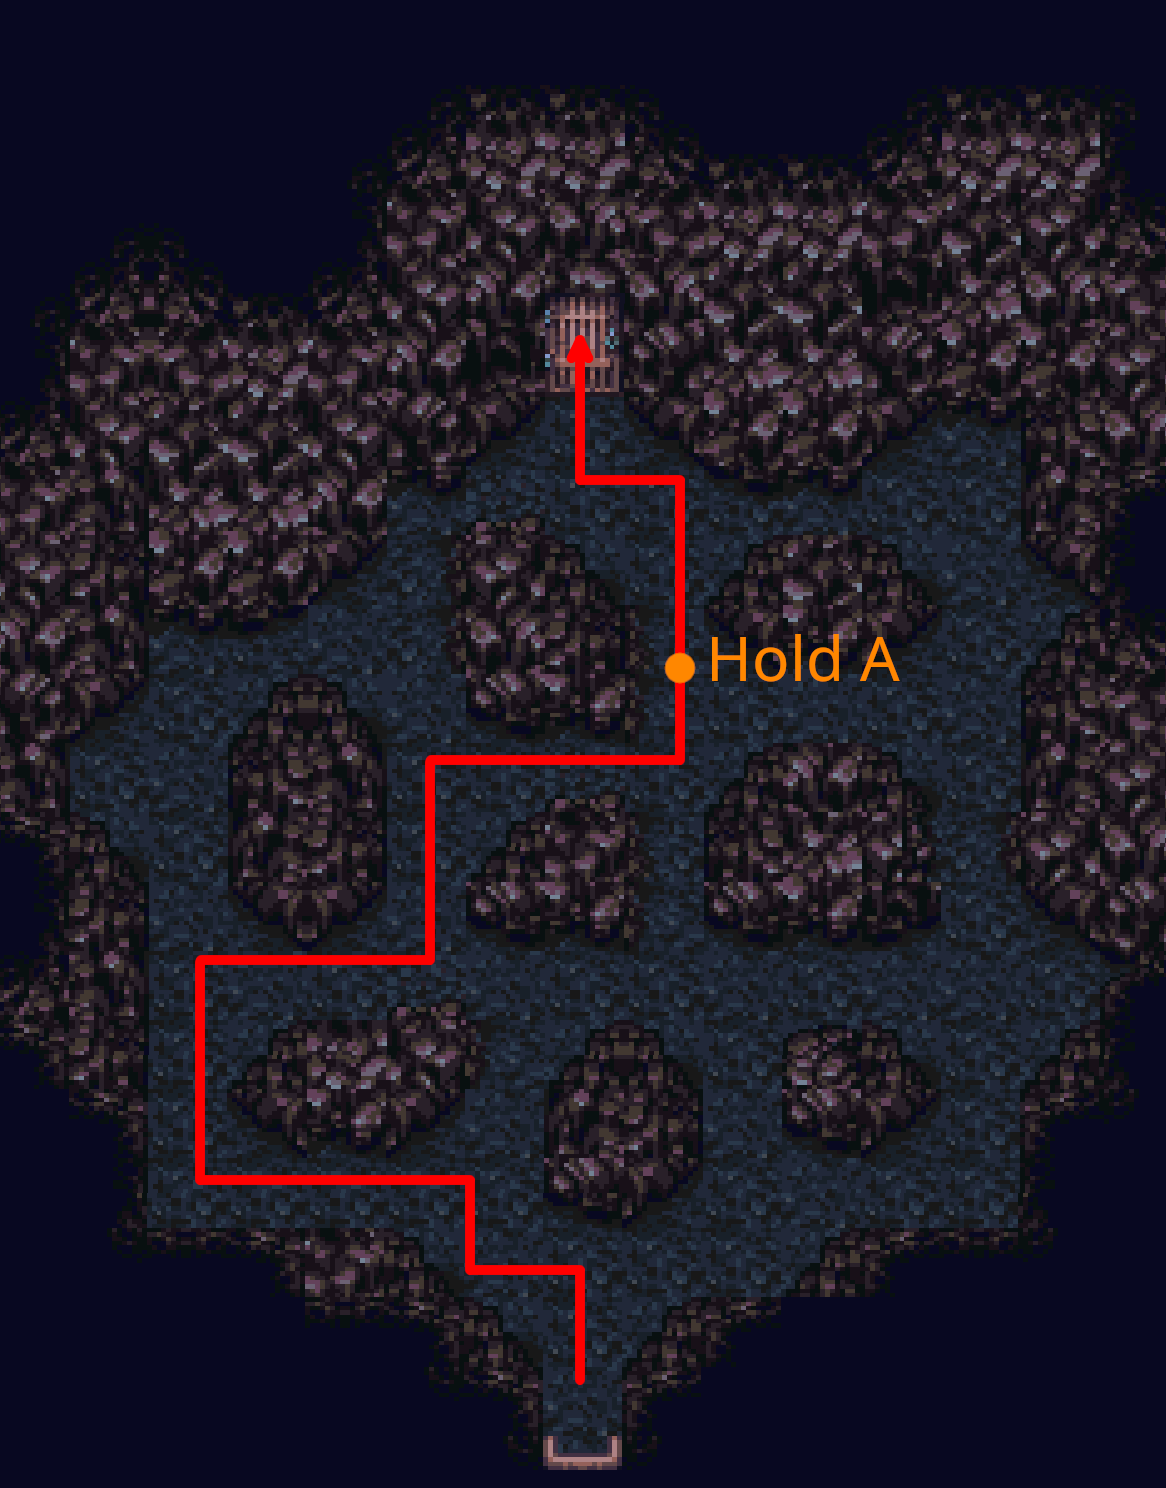
Move north and skip the encounter trigger by moving right to avoid the centre grate (see the picture below). Continue north until a forced encounter.
Encounter Guard x2 + Lobo
Vicks/Wedge
Fire Beam enemy on right side
Vicks/Wedge
Fire Beam other enemy on right side
TerraBio Blast left side
Vicks & Wedge
Flee (hold L+R as soon as Bio Blast starts)
Continue north onto next screen. North until next forced encounter.
Encounter Guard x2 + Vomammoth x2
Vicks/Wedge
Fire Beam Vomammoth
Vicks/Wedge
Fire Beam other Vomammoth
TerraBio Blast
Vicks & Wedge
Flee (hold L+R as soon as Bio Blast starts)
Continue north onto next screen. North to the barricaded cave entrance. Move to the middle of the barricade. After the scene, attempt to enter the cave for a boss battle.
Note: If you got any random encounters on this screen, you did not manipulate your seed correctly.
Whelk 1,600 HP
You can hold A during the dialogue to skip it. This is true for all dialogue in battles (even in cutscenes).
Terra
TekMissile Whelk ATB wait
Vicks/Wedge
Heal Force Terra
TerraTekMissile Whelk ATB wait
Vicks/Wedge
Fire Beam Shell
TerraTekMissile Whelk
Vicks/Wedge
Fire Beam Whelk (in case of low damage rolls)
If you ever see Gruuu…, you did not ATB wait correctly/well enough.
North into the cave, then north to the Esper. Scenes ensue.
Upon fading on to Terra in bed, hold →. Talk to the man. Name Terra T.
Go out the door and left into the cave.
Encounters
Terra
Fire all
Follow the linear path. Ignore the north chest, but get the west chest (Sleeping Bag). Go north at the fork.
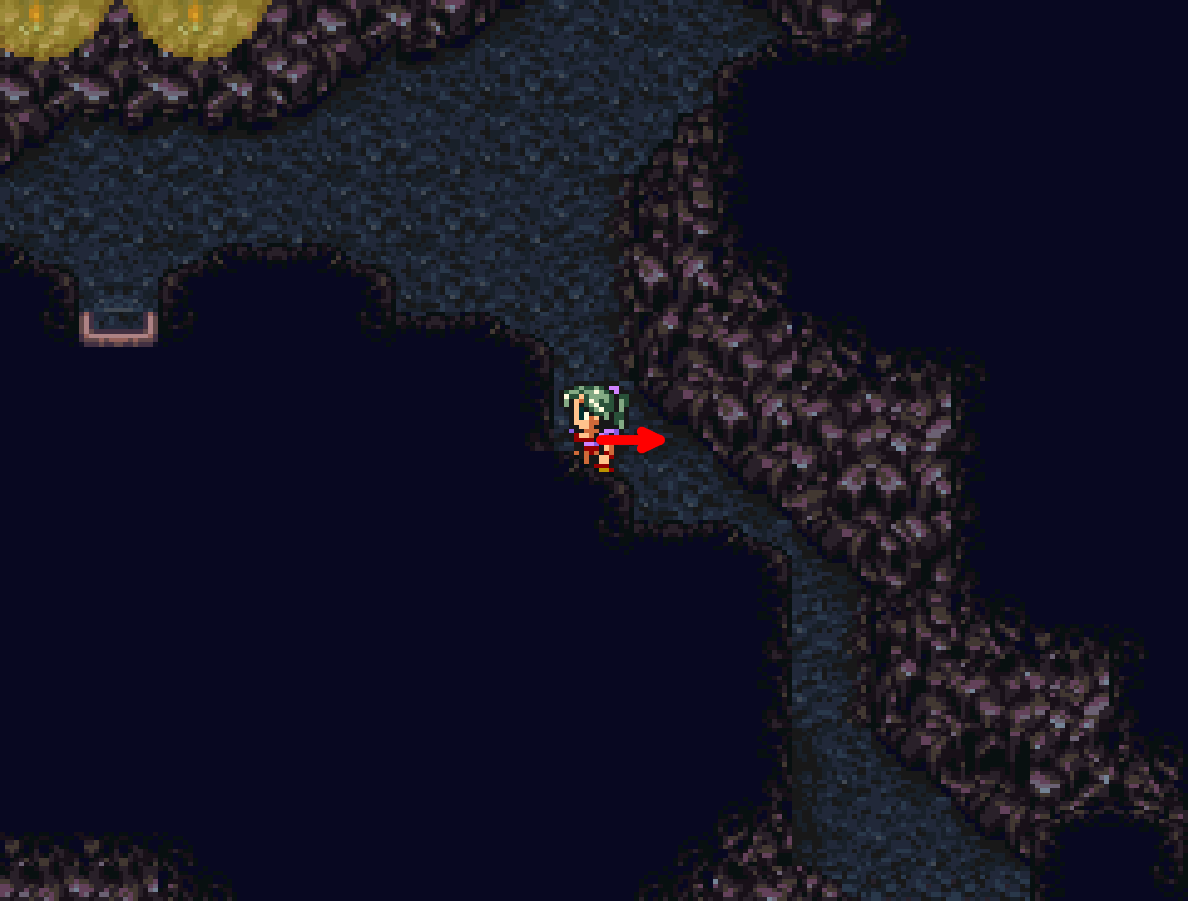
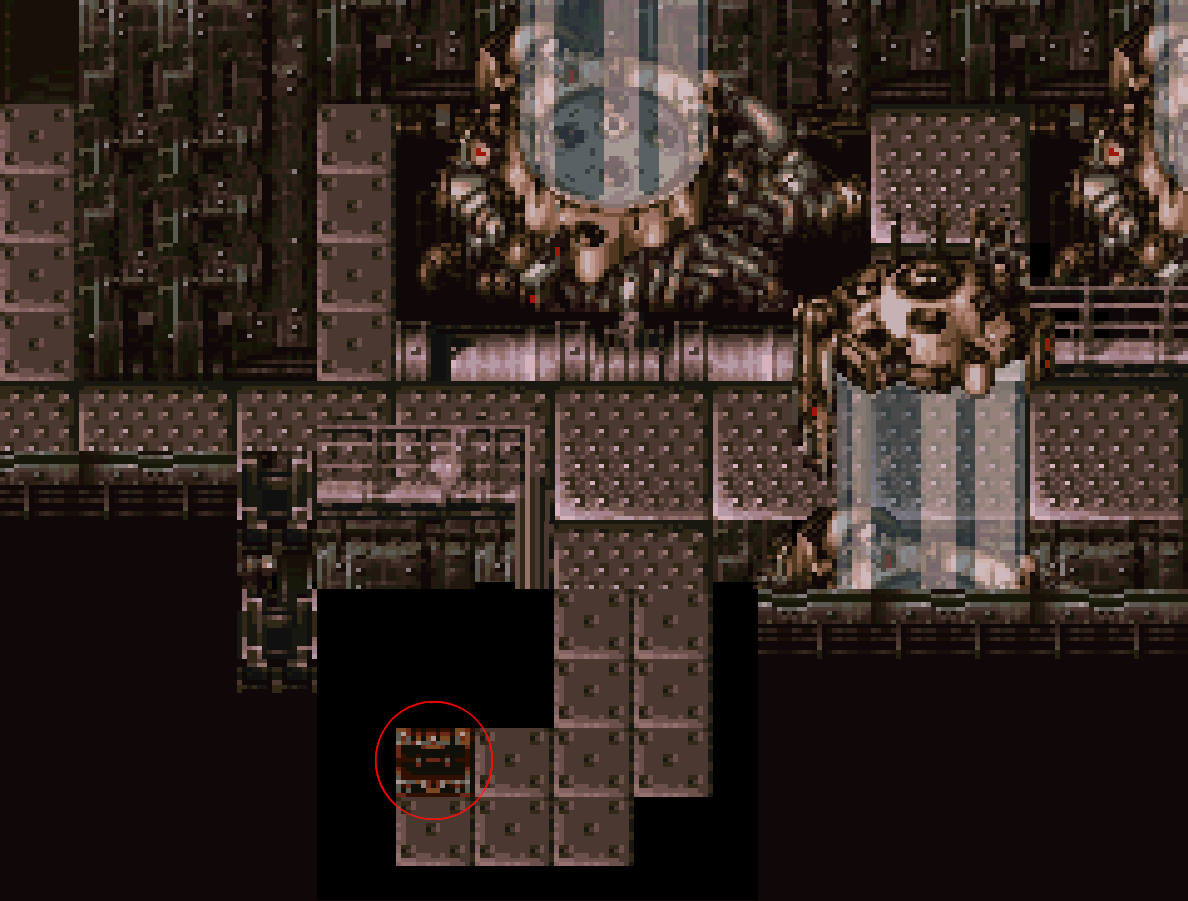
Terra should level to 6 before moving on. Move right at the tile in the image below to get the last encounter necessary to level.
Continue north from the picture above to start scenes. Name Locke L.
When the screen fades to black with the moogles, choose No (option 2).
Move down two tiles with Locke. Press Y to switch to Mog. Follow the path in the image. To avoid encounters, move past the NPCs when their arms start to move. Move to the end of the first line, wait for the last NPC to start coming up, then use the trick again to bypass them.
Press A at the NPC to start a boss.
Marshal 420 HP + Lobo x2
Mog
Fight Marshal
Not Mog
Fight Lobo
Not Mog
Fight other Lobo
Not Mog
Fight Marshal
MogUnequip all equipment, then Fight Marshal
All
Fight Marshal
When Locke exits the cave and starts moving right, hold ↓ to exit to the world map.
Move south, then west before the forest. Southwest to Figaro Castle.
Talk to the gate guard. North until the throne room. Talk to Edgar. Name Edgar E.
South with Terra until you reach the exterior. Take the west door, go down the stairs, then exit south to go outside.
Go west and north into the tower, up the stairs, and talk to the woman to the far west. Name Sabin S.
Return to the throne room. Talk to Edgar. Move south, talk to both of Kefka's guards, then talk to Kefka. Move north and talk to Locke.
Hold ↓ after Locke says to follow him, then go into the east door. Go down the stairs, outside, and then east and north into the tower.
Talk to Locke. As Edgar, hold ↑ when you reach the exterior of the castle. Talk to the guard to start an encounter.
Encounter M-Tek Armour x2
Edgar
AutoCrossbow ATB wait
LockeSteal
TerraDefend
EdgarAutoCrossbow
Continue in the direction you start out facing. Go towards the cave to the left, and disembark next to the entrance. Walk inside.
Talk to the guard, then go inside.
Encounters
Edgar
AutoCrossbow
Locke & Terra
Fight
Walk straight north and use the spring. Exit to the east.
Follow the path, then go east at the fork. At the next fork, go southwest and up the stairs to the door.
Pass through the room. Exit south to the world map.
Southeast to South Figaro.
East and south to the relic shop.
Shop 4,500 GP
Sprint Shoes
x3
Menu
All
Back row
TerraSprint Shoes
Exit shop, go west and north to the chocobo stable. Buy chocobo.
Follow the path east, then north to Mt. Kolts.
North into caves.
Encounters (inside)
| Brawler x2 |
All Flee |
| Tusker x2 |
Edgar
AutoCrossbow TerraFire Tusker |
Encounters (outside)
Terra
Fire Tusker, if present
EdgarAutoCrossbow
Locke/Terra
Fight in case of low damage rolls
During one encounter with 4+ enemies, have Locke flee.
Before Vargas, have Edgar equip the Mithril Pike, then have Locke equip the Mithril Blade.
Levels before Vargas
Edgar
10
Locke9
Terra8
Inside the cave, go up the stairs and exit to the southeast.
Outside, go east into the caves.
Go northeast, ignoring the first bridge, and take the hidden path. Follow the second bridge into a room.
Pick up the chest for an Atlas Armlet.
Menu
Edgar
Atlas Armlet
Return from where you came and take the first bridge you ignored earlier to the exterior.
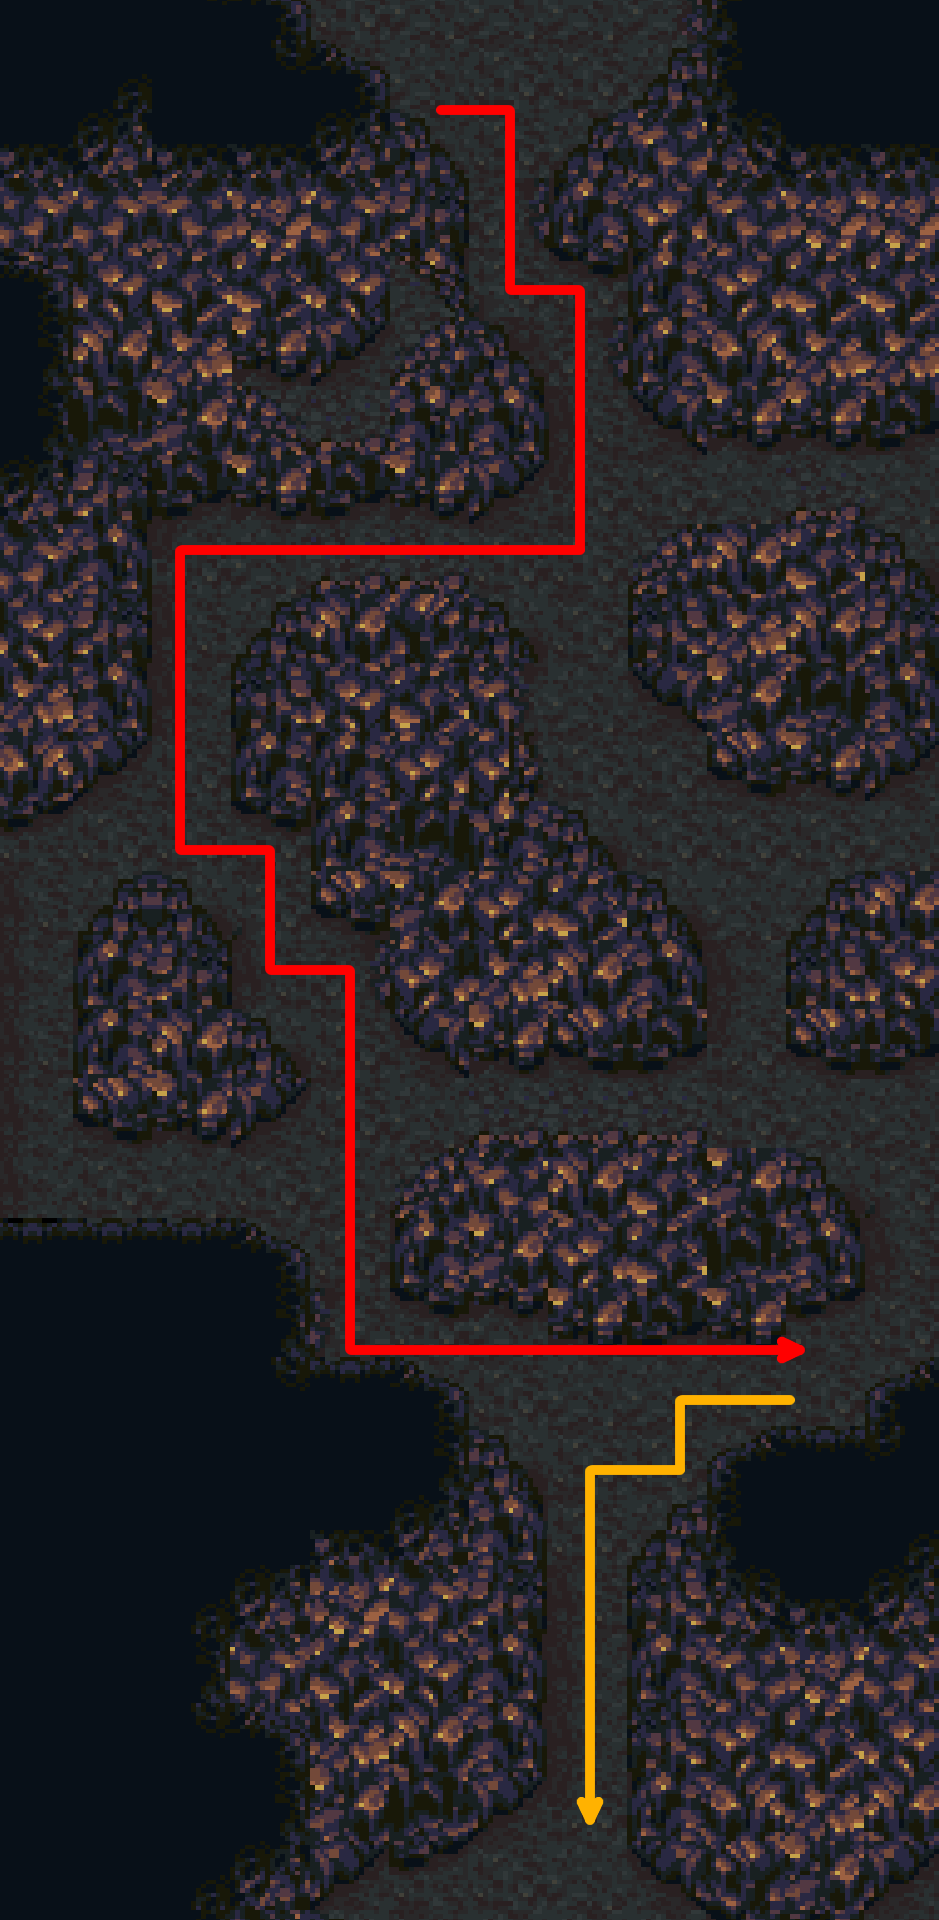
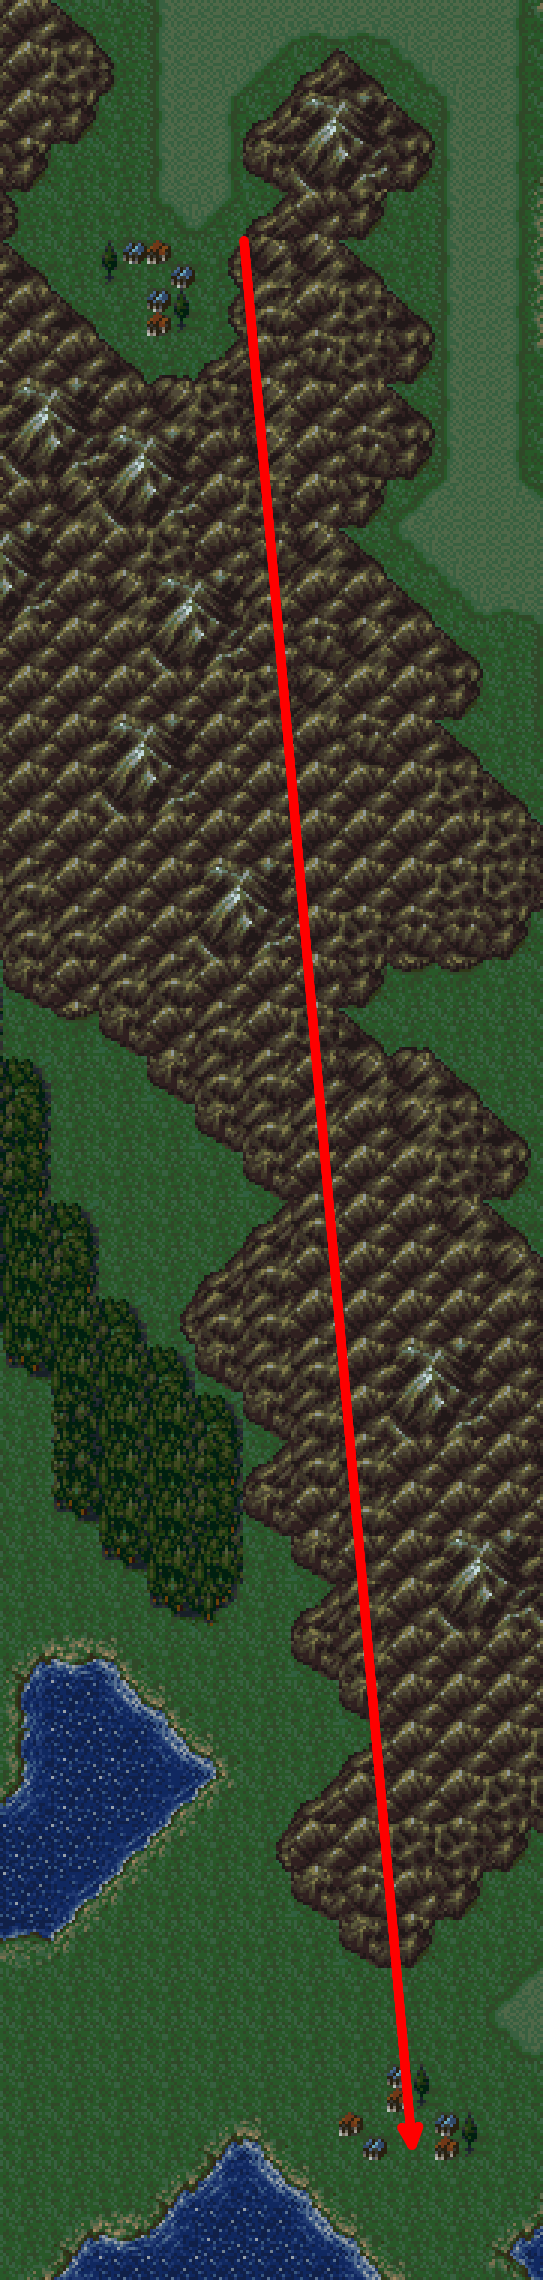
Follow the silhouette: north, then east.
Follow the path south and west, entering the second cave.
Take the bridges east and north until you reach the exterior.
Follow the path north, then east across the bridge. Enter the cave, then exit east.
Follow this path until a fork. Go west at the fork. Continue until you reach Vargas.
Menu
Terra
Cure all
Press A at Vargas to start a boss fight.
Vargas 11,600 HP + Ipooh x2
Edgar
AutoCrossbow
TerraFire Ipooh, then other Ipooh, then Vargas
LockeRow, then Fight
After the intermission, you will be using Sabin.
Sabin
Pummel (← → ←)
After the scene, go into the cave.
Encounters
All
Flee
Go east, down the stairs, and exit. Exit south to the world map.
Go east as little as possible to go north. North, west one tile, more north.
Enter the cave in the eastern mountains.
North into the cave. North and talk to the man. Walk into the door when you regain control.
East, then south. Talk to Banon. Scenes ensue.
Fading up on Terra, hold →. Talk to Locke, get the chest for a Fenix Down, then exit the room.
Go west and north into the next room. Continue north until the chests. Get the bottom left chest (Fenix Down), the chest above it (True Knight), and examine the pot above that (Tincture).
Take the hidden path to the east and open the chest for a White Cape.
Return to the chest room and get the final, unopened chest (Air Lancet) on your way out.
Go south towards the entrance to the room you woke up in, then east and north into the room you met Banon in. Talk to Edgar.
Leave this room and go south to the bar area. Talk to Sabin.
Talk to the guard at the entrance of the cave, then leave the cave. Talk to Banon and choose the second option (No).
The game will move you back in to the cave. Go out and choose the second option two more times. Scenes ensue. Receive Genji Glove.
With control of Edgar, go north back into the hideout. Continue north to the save point and touch it.
Menu
Sabin & Banon
Back row
SabinSprint Shoes
EdgarAdd Genji Glove
Save the game and reset.
Optional: If doing the manipulation, reset the game again at the load menu. After loading, exit south when the NPC walks onto the carpet from below.
Load the game.
Go south two screens until the cliff with the raft. Step on the tile above the raft. Choose the first option (Yes).
When prompted, choose to go left. This will happen twice.
First encounter
All
Flee
Second encounter
Edgar
AutoCrossbow
Others
Flee
EdgarAutoCrossbow
Other encounters
All
Flee
When you arrive at the first save point, go south back on to the raft.
When you arrive at the second save point, do the menu below.
Menu
Edgar & Banon
Front row
Get back on the raft.
Ultros 3,000 HP
Hold Y to switch to Edgar.
Edgar
Fight
Banon
Health Terra Fire SabinAura Bolt (↓ ↓ ←)
EdgarFight ATB wait
Banon
Fight until win
TerraFight until win (1/16 chance of Riot Blade, ending the fight)
SabinAura Bolt (↓ ↓ ←)
EdgarFight until win
SabinAura Bolt (↓ ↓ ←)
SabinFight until win
Choose Sabin's scenario.
East into the hut.
Talk to Shadow. Name Shadow S. Choose the first option (Yes). Exit south.
East until you hit the coast, then south. West to Imperial Base.
Hold ↓ as you load in to trigger a scene. Name Cyan C.
Menu
Cyan
Sprint Shoes
Battle speed
1
Walk south and press A at the NPC to start an encounter.
Encounter Leader
Cyan
SwdTech 2
Hold ↓ as Cyan's scene fades out to trigger another scene.
When Leo enters the tent, go west and south to trigger another scene.
Encounter Kefka
Any
FightFollow Kefka and talk.
Encounter Kefka
Any
FightMenu
Sabin
Front row
ShadowEmpty, then equip Imperial in right hand
SabinOptimise
Battle speed
6
Follow Kefka and talk.
Encounter Templar x2 + Soldier x2
Sabin
Fight Soldier (the closer enemies)
ShadowFight other Soldier
SabinPummel (← → ←)
ShadowThrow Air Lancet
North with Cyan. Go down the stairs and south out of the room. East and through the double doors.
Exit the throne room south. Go into the eastern room.
As Sabin, talk to Cyan (from the sides or behind, but never in front).
Encounter Grunt x4
All
FightTalk to Cyan.
Encounter Grunt x3
All
FightTalk to Cyan.
Encounter Cadet + Grunt x2
All
Wait for Cyan to attack
ShadowFight Grunt
SabinAura Bolt (↓ ↓ ←)
Move east until a forced encounter.
Encounters
All
Fire BeamMove north until a forced encounter.
Exit to the north.
Move west across the bridge, then south.
Go east across the southern bridge, then continue east until you can go south.
Go south into the Phantom Forest.
Go east, then exit north.
After using the spring, go east and exit south.
Go east, then exit to north.
Go east, then exit to the north again.
Move north for a scene, then enter the closest western train car.
Encounters
All
Flee
After the scene, try to exit south where you came in. Go all the way west and leave the car.
Enter the western car, then go to the western end of this car.
Force an encounter next to the exit before leaving.
Exit, then enter the next car. Inside this car, move north until a ghost appears at the door. Go south and talk to the ghost for an encounter.
Encounter
All
Flee
Go up the ladder, then all the way west.
Enter the car and hit the switch. Re-enter and hit the switch again.
Exit to the west, then walk around the next car and enter from the west.
Open the chest for Earrings.
Exit to the west, then go up the first ladder and down the second ladder for the next two cars.
Continue west until the engine, then enter the engine.
Hit the switches on the outside, then exit and continue west.
Go north onto the engine and interact to hit a switch and start a boss.
Phantom Train 1,900 HP
Any
Fenix Down
With control of Sabin, do the following menu.
Menu
Items
Arrange your items so these items are the top four (any order):
- Tincture
- Black Belt
- White Cape
- Tent
Remove Sprint Shoes, equip Earrings
Just wait until the game teleports you outside.
Move south, east, then north into Baren Falls.
North until a cutscene where Shadow leaves.
Move north and choose to jump off the cliff.
Rizopas 775 HP + Piranha x2
Any
Fight Piranha
All
Back row
All
Defend
Wait one minute.
Cyan
Fight other Piranha
SabinAura Bolt (↓ ↓ ←)
CyanSwdTech 1
SabinAura Bolt (↓ ↓ ←)
Name Gau G. Exit south to world map.
South, then east, then north to Mobliz.
Go to the item shop in the northeast.
Shop 150 GP
Sell
Top four items in your inventory
Buy
Dried Meat
Exit south to world map.
Encounters
Hornet x2 + Bleary x3
Flee
Rhobite x5
Flee
Ghost x2 + Poplium x3
Flee
StillGoing x3
Flee
Others
FightWhen Gau appears:
Any
Dried Meat Gau
Once again, you can hold A until the (long) scene with Gau ends.
Go west until the reaching the southern, western edge of the mountains, then go south.
Go east into the cave.
Go north for a scene, the work clockwise around the cave until another scene.
You will automatically enter the Serpent Trench.
When prompted, first choose right, then choose left.
Encounters (4)
All
Flee
When you arrive in a cave, go north to the exit.
Exit to the north, then go east past the cafe.
Go north into the market and go to the armour shop.
Shop 600 GP
Buy
Magus Hat
Continue north to the item shop.
Shop All GP
Buy
Max Smoke Bomb
Return south to the ship. Talk to the captain and depart (option 2).
Choose Locke's scenario.
Menu
Locke
Optimise
LockeSprint Shoes
LockeFront row
Go west and up the two flights of stairs to the item shop.
Talk to the merchant next to the clock for an encounter.
Encounter Merchant
Locke
Steal
Exit south and go down one flight of stairs. Enter the building to the west.
Go north through the door, then west down the stairs.
Talk to the kid at the bottom of the stairs, then exit north.
Go immediately west, then south and west across the hidden bridge.
Continue south to the cafe. Inside, go up the stairs, east across the room, then down the stairs.
Talk to the merchant in the northern room for an encounter.
Encounter Merchant
Locke
Fight x2
Follow the same route you took to exit the cafe.
Follow the same route you took back to the staircase with the kid.
Talk to the kid, go up the stairs, then go west and south to the room with the old man.
Talk to the old man, then return to the kid and choose "Courage" (option 2).
Exit to the south and take the stairs down.
Take the Elixir from the clock, then exit north.
Go east and south. Take the Fenix Down from the southern barrel, then enter the northern door.
Go west and up the stairs, then go east into the first door.
Walk north to the bookcase, then west through the bed to the western bookcase. Enter the secret passage north of the bookcase.
Basements
Go down the stairs, then follow the path until prompted to change clothes. Do so (option 1).
Continue south and then east into the hidden basement.
Get the Hyper Wrist and the Running Shoes from both of the cells, then return upstairs.
Go east and examine the first door for a scene. Name Celes C.
Enter the door, and choose to remove her chains (option 1).
Talk to the guard and steal the key (option 1).
Menu
Locke
Add Running Shoes
All
Back row
Exit south and go east into the last door.
Go north to the bookshelf, then go west and follow the path around.
Get the chest with 500 GP from above, then the chest with 1,000 GP next to the clock, then the chest with 1,500 GP from the closest chest to the east.
Go north to the clock in the northwest corner, then interact with it and choose to wind it (option 1).
Enter the new door.
Encounters
Any
Smoke BombTo make things easier for later, you can start arranging your items while fleeing so Smoke Bomb is at the top and there are 4-5 open slots below.
Head east, ignoring the first fork that lets you go south.
Take the somewhat hidden southern path when the two chests to the east come into frame.
Continue south until the bottom, then go west and open the chest for some Earrings.
Go east, then north, and go into the first eastern hallway available.
Go up the stairs, north through the door (following a short scene), then exit to the world map east.
Go west until you get to the mountains, then go north into Figaro Cave.
Go north up the stairs.
Go east, then go south down the stairs.
Continue east to the fork, then go north.
Go west and up the stairs.
Go east across the bridge, then get the chest for a Thunder Rod.
Exit, go down the stairs, then go east. Go north at the fork.
Head west, then south for a boss battle.
Tunnel Armour 1,300 HP
Any
Thunder RodNow is a good time to arrage your items so Smoke Bomb as at the top and there are open spaces below.
Choose Terra's scenario.
Encounters
Any
Smoke BombRide the raft until the world map.
Go west and north into Narshe.
Immediately go west to the hidden cave path. Go northeast through the cave.
Take the west path, then go up the stairs and into the western cave entrance.
Go north, then west across the bridge. Go north again to enter the puzzle room.
Do the puzzle according to the image.
Exit north and follow the path around until reaching the door that leads south.
Enter the door, then go west and north.
Go through the northwestern door, then follow the path to a chest. Receive the Rune Edge.
Exit east.
Encounters
Not Edgar
Smoke Bomb EdgarReplace Mithril Blade with Rune Edge
Take the southern bridge, then go east and south, following the bridges.
Continue east at the fork, then cross the bridge into the house.
Walk south through the door in the house to start a scene (3:17).
Talk to Banon and choose the first option. Say no to the moogle (second option).
Party
Party 1
TerraParty 2
- Cyan
- Edgar
- Gau
- Sabin
Party 3
CelesSwitch to Party 2 (press Y) and follow the route according to the image.

While waiting for soldiers to pass, do the following menu.
Menu
Sabin
Add Earrings
Sabin & Cyan
Back row
Make sure not to collide with the soldier before Kefka, then press A at Kefka to start a boss.
Kefka 3,000 HP
ATB wait two attacks that aren't from Gau.
Cyan
SwdTech 1
Edgar Fight Gau Exocite SabinAura Bolt (↓ ↓ ←)
Repeat until Kefka is dead.
Party
- Edgar (must be leader)
- Sabin
- Locke
- Cyan
Get the Elixir from the northwestern clock, then exit to the south.
Follow the path south and keep to the east. Enter the storage building.
Collect all the chests except for the western-most chest at the north side of the room (Wall Ring, Hyper Wrist, ThiefKnife, Sneak Ring, Earrings, 5,000 GP).
Leave the building and go down the wooden stairs. Go west to the centre path and follow it south to the world map.
Go southwest to Figaro Castle as done previously.
North to the room before the throne room.
Enter the eastern room.
Shop 2,000 GP
Buy
- Drill
- Flash
Exit the room, then enter the western room.
Shop 6,500 GP
Sell
- Peace Ring
- Hyper Wrist x2
- Wall Ring
Buy
- Fenix Down x11
- Revivify x25
Exit the room, go south to the exterior, then go one room south.
Take the western stairs and talk to the man. Go to Kohlingen (option 1).
After the scene, go back up the stairs and exit south until the world map.
Go northeast to the house.
Enter the house. Examine the southwestern pot for a Hero Ring.
Exit the house, immediately to west to exit to world map.
Go northwest to the Chocobo Stable in the forest.
Buy a chocobo.
Go south back to Figaro Castle.
Go past the castle to the south and follow the path around to Zozo.
Go west, then go south. Enter the building directly to the west.
Go up the stairs, then up the exterior stairs. Go back inside.
Follow the line of NPCs going north, then go up the stairs.
Go up one flight of stairs, then go into the western door to jump to the other side.
Move west to jump again. Go inside the door.
Go north, then west up the partially hidden stairs.
Move south and exit. Go up one flight of stairs, then enter the eastern door to jump across.
East to jump across again. Go up the stairs, then enter the door.
Go up all the stairs, then use the southern exit.
Go up two flights of stairs and enter the door. Get the Fire Knuckle from the chest.
Exit, go up one flight of stairs, then stop before the NPC.
Menu
Locke
Front Row
EdgarBack row
EdgarHero Ring + Earrings
LockeOptimise
Talk to the NPC to start a boss.
Dadaluma 3,270 HP
Locke
Fight
Sabin
Aura Bolt (↓ ↓ ←)
Edgar DrillIf Dadaluma attacks (not including counterattacks) before those three actions go out, wait for him to attack again.
Regardless of if he attacked, ATB wait two attacks after the initial three.
Cyan
SwdTech 1
After the kill, try to equip the Mithril Knife on Locke. There is a spot to do it later if you can't.
Note: Dadaluma should not get a turn after waiting. If you see healing, you did the fight incorrectly. Adds being summoned is okay (do not kill them).
Go up the stairs and through the door.
Go north to Terra.
After the scene, pick up all the magicite except the western-most one.
Go south, then west at the fork and open the chest for Running Shoes.
Exit, then go east and south to Celes.
Party
Add
- Sabin
- Edgar
Exit to the east.
Menu
Locke
Back row
SabinFront row
LockeRamuh
SabinStray
EdgarSiren
SabinGenji Glove + Atlas Armlet
CelesCure all until full
Go southeast to Jidoor.
Go west to the armour shop.
Shop 2,200 GP
Buy
White Dress
Exit the armour shop, then go east and north to the mansion and enter.
Go north and talk to the Impresario.
After the scene, go south and pick up the letter.
Name Setzer S.
Exit the mansion south.
Go south to the chocobo stable and buy a chocobo.
Go south to the Opera House.
North and talk to the Impresario.
After the scene (2:32, no mashing), go east and exit to the southeast.
Go down the stairs, then go east and into the room.
Talk to Celes.
As Celes, go through the northeastern door and exit to the west.
Select options 1, 2, then 1 for the song.
Talk to the NPC and follow him.
Go up the stairs to the balcony for a scene (2:07, no mashing).
As Locke, go south and examine the letter. Exit south.
Go back up the stairs and through the door.
Go west and talk to the Impresario (western-most NPC) for a scene (1:17, no mashing).
Go east and then north into the room.
Talk to the NPC and use the east switch.
Exit the room, then go around to the northwestern room opposite you.
Exit to the north onto the rafters.
Fight four rats. If you did not equip the Mithril Knife on Locke earlier, do it in the first rat fight.
Encounter Vermin + Sewer Rat x2
Sabin
Fight Vermin (gold rat)
Edgar Flash Locke FightEncounter Vermin x2 + Sewer Rat x3
Sabin
Fight bottom Vermin
Edgar Flash LockeFight any Sewer Rat still alive
SabinFight other Vermin
Go to Ultros and talk to him to start a fight (after a scene).
Ultros 2,550 HP
Sabin
Fight ATB wait
Locke Ramuh Edgar Drill Sabin FightTalk to Setzer. After some scenes, you will be on the world map.
Enter the airship.
Talk to the left NPC to heal if necessary.
Talk to the right NPC for a shop.
Shop 8,400 GP
Buy
- Warp Stone x4
- Smoke Bomb x18
Make sure you have at least 5,600 GP left after this shop.
Menu
All
Back row
CelesRunningShoes + Earrings
EdgarHero Ring + Empty
SabinEarrings + Earrings
Exit the airship and go northwest to Vector.
Go northeast and talk to the man behind the boxes.
Climb up the boxes and onto the girders.
After jumping off the girders, go north into the Magitek Factory.
Go west down the stairs and into the tube.
Go south to the chest to get a Flame Sabre.
Take the hook across the gap.
Go east to the tube with a ladder below it and go south through it.
Go east across the conveyor belt.
Open the chest for a ThunderBlade.
Go south and get the Remedy from the chest.
Go west on to the conveyor belt.
Go east on to the conveyor belt, then go south for a scene.
Important: Locke should know Bolt before going down the conveyor.
Go southwest down the conveyor belt.
Menu
Celes
Cure all if Celes is below 202 HP or Locke is below 186 HP
Talk to Ifrit for a boss fight.
Ifrit 3,300 HP
Buffer Flee during all actions, including enemy actions.
Locke
Bolt
Celes
Ice
Locke
Bolt
As soon as Ifrit starts to disappear, Flee.
Talk to Shiva, then talk to Ifrit. Collect both magicites.
Go through the eastern door.
Go up all the stairs, then exit south.
Go west across the factory. Grab the hidden chest before the railings for a Break Blade.
Exit northwest and walk to the NPC.
Menu
Revive anyone if necessary.
Celes
Cure all to full
CelesIfrit
LockeReplace RunningShoes with Sneak Ring
EdgarAdd RunningShoes
EdgarOptimise
CelesOptimise
LockeOptimise
Number 024 4,777 HP
Edgar
Sleep
Locke
Steal until successful, then do nothing
Celes Ice SabinAura Bolt (↓ ↓ ←) ATB wait
EdgarFlash until dead
Celes Ifrit SabinAura Bolt (↓ ↓ ←) until dead
CelesIce until dead
Go north through the door, then north to the switch and interact.
After the scene, follow Cid east onto the elevator.
At the bottom of the elevator, do the following menu.
Menu
Locke
Replace Sneak Ring with RunningShoes
LockePhantom
EdgarShoat
SabinBismark
Order
Make Sabin leader
Talk to Cid to start five encounters and a boss. Consult the encounters below for formations seen.
Encounter Mag Roader
Edgar
Drill
Sabin
Fight in case of low damage roll
Encounter Mag Roader x4
Edgar
Flash
Encounter Mag Roader x2
Edgar
Flash
Sabin
Fight
Number 128 3,276 HP
Edgar
Flash
Sabin
Bismark ATB wait
LockePhantom (for safety)
Edgar Flash SabinAura Bolt (↓ ↓ ←) ATB wait until dead
EdgarDrill until dead
If not dead after two rounds of Drill and Aura Bolt, queue another Aura Bolt and a Bolt from Locke.
Go south until a scene with Setzer.
Cranes 1,800 HP + 2,300 HP
All
Wait for both Cranes to attack
Locke Phantom SetzerChocobop ATB wait
SabinBismark ATB wait
EdgarBio left Crane
LockeFight right Crane
SetzerChocobop ATB wait
SabinAura Bolt (↓ ↓ ←)
EdgarBio left Crane
LockeFight right Crane
SetzerFight if necessary
Exit to the south.
Go south past the fence, then east to the fork. Go north to the NPC and interact.
Choose option 1.
Walk north to the bed and interact.
Again, exit south and go east to the fork, then north.
Interact with the NPC, then exit north.
Go north to the NPC and interact.
Go south down the stairs and talk to the eastern NPC.
Move to the southern exit and interact with the NPC in the door.
Exit south.
Go south, the west. Go north at the fork.
Exit north, then go north to the NPC and interact.
Choose option 1 (Yes), then option 2 (No) when talking to Setzer.
Go east down the stairs.
Exit south.
Talk to an NPC to change party (option 2).
Party
- Terra
- Locke
Talk to the eastern NPC and unequip all other party members (option 1).
Exit north.
Use the controls to lift off.
Fly directly south to Jidoor.
North through the arch and up the stairs.
East to the auction house.
Auction House manipulation
Repeatedly enter and exit the auction house. Keep track of which direction the female NPC outside the auction house moves each time you do so. Look for the following pattern.
- Right
- Up
- Up
- Left
- Down
- Left
- Down
- Right
After seeing this pattern, talk to the NPC inside the auction house to start the auction.
Buy ZoneSeek for 10,000 GP (mash A until you receive it).
Menu
Terra
ZoneSeek
TerraOptimise
LockeOptimise
TerraRunningShoes + Earrings
Move south past the item shop, then exit east to the world map.
Enter the airship.
Fly northeast to Narshe.
Go north for a scene.
An Elixir can be obtained from the clock in the northwest for safety.
Exit south.
Exit Narshe.
Enter the airship.
Fly north and wrap around the map to the Imperial Base.
Go east for a short scene.
Go north and up the stairs.
Go east and down the stairs.
Exit east.
Go east into the cave.
Encounters
Any
Smoke BombDuring a battle, equip the ThiefKnife on Locke.
Go east and exit south.
Go down the western stairs and pick up the Tempest.
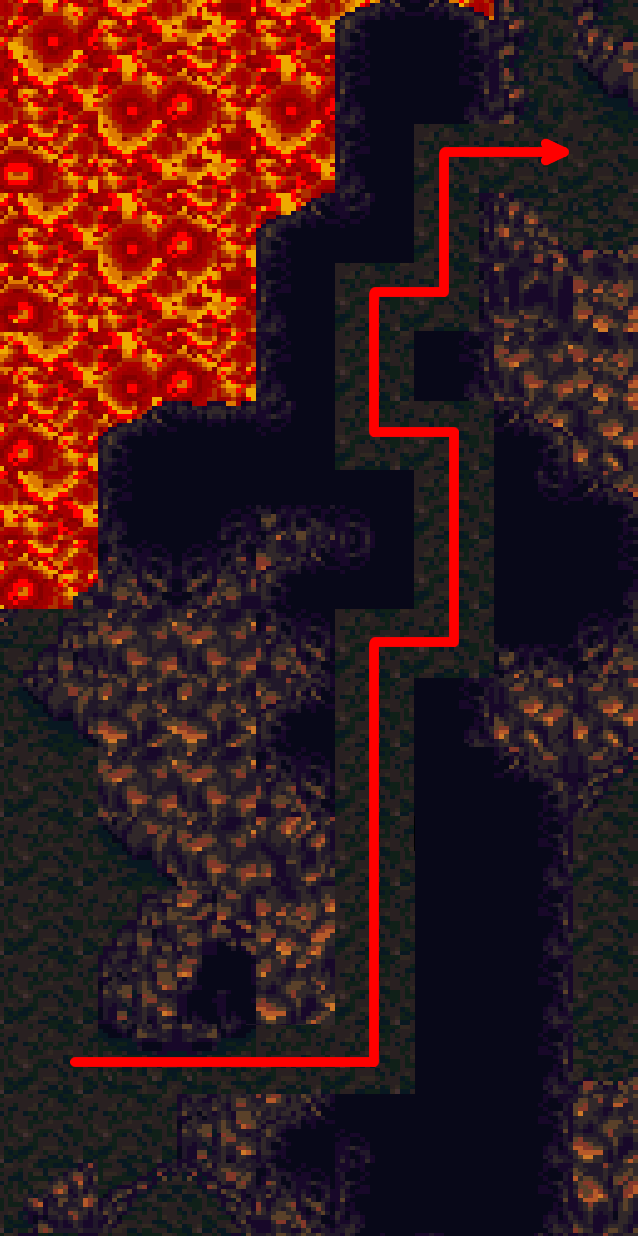
Go down the eastern stairs and exit south.
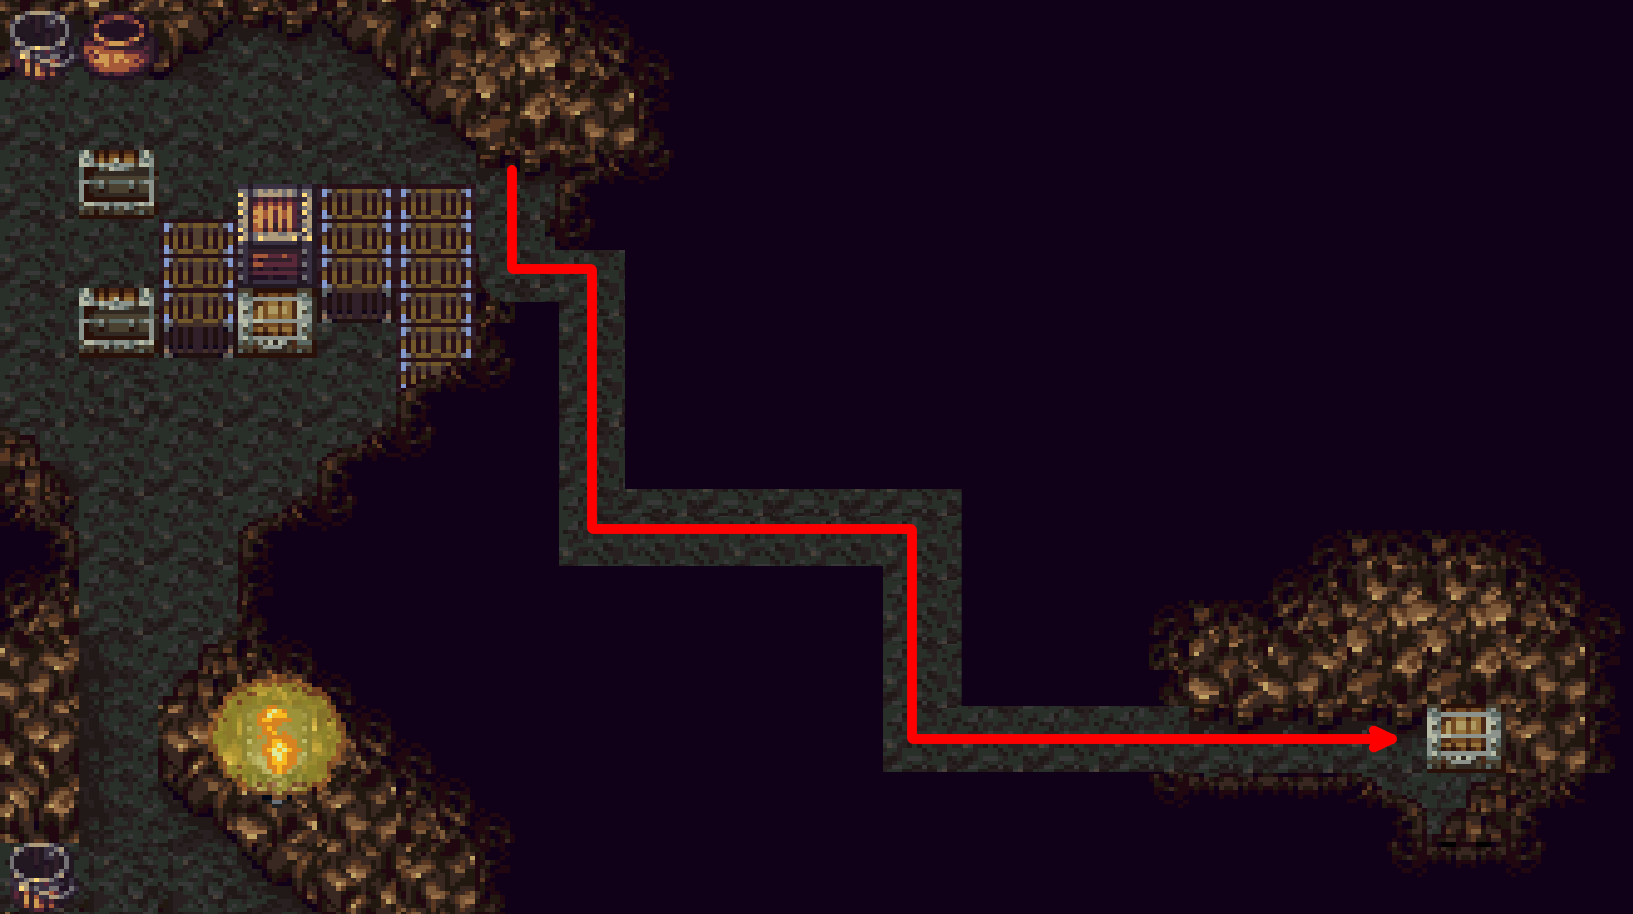
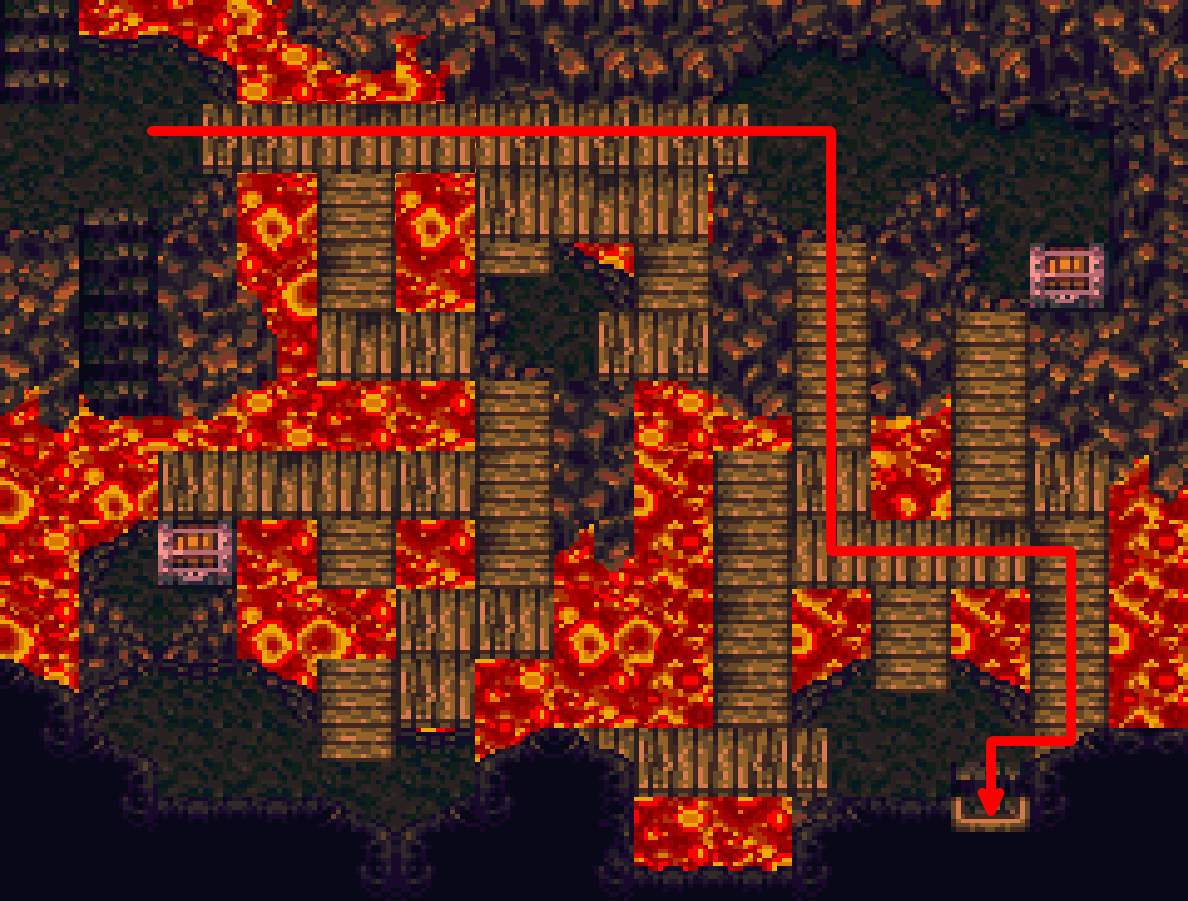
Follow the path in the image.
Encounters
During the first encounter, Locke can use Phantom for safety.
All
Revivify enemies until only one remains
LockeFlee
TerraRevivify last enemy
Note: Locke can flee after the final Revivify animation, assuming he has full ATB.
Go south, then go east through the cave.
Go east up the ramp, then go east across the bridges.
Hit the switch on the second bridge.
Go south down the stairs that appeared.
Go east into the cave, then north through the hidden passage.
Continue east, then go south down the stairs near the switches.
Go north across the eastern bridges and hit the switch.
Go across the bridges and exit south.
Go east and north into the big cave entrance for scenes.
Encounter Kefka
Locke
Smoke Bomb
Use a Warp Stone.
Go west into Imperial Base.
Go west, then up the stairs.
Continue west, then go down the stairs.
Go south and exit west for a scene.
Go east down the stairs.
Go south two screens to get to the shops.
Talk to the right NPC for a shop.
Shop 6,300 GP
Buy
Smoke Bomb x21
Exit the airship south.
Go northwest to the chocobo stable in the thin part of the forest.
Go northeast to Vector in the centre of the continent.
Go west, then go north up all the flights of stairs.
Exit north to Imperial Castle.
Go west, then go up the eastern stairs for a scene.
Go north and up the stairs. Exit through the double door.
Leave and re-enter immediately.
Go north to the exit.
Go north to Gestahl.
Note: For safety, you can do the menu below now.
Talk to Gestahl.
Menu
Terra
Maduin
TerraEquip Thunder Blade and Magus Hat
TerraReplace RunningShoes with Earrings
LockeReplace RunningShoes with Sneak Ring
Exit south and talk to the four NPCs directly to the sides of the stairs.
Go south through the double doors.
Go east, then go north up one flight of stairs.
Go into the room on this floor.
Go north and talk to both NPCs. Open the chest for a Gale Hairpin.
Exit south and return to the double doors.
Exit south.
Talk to the eastern soldier in the MagiTek armour.
Talk to the western MagiTek soldier for a battle.
Encounter
Locke
Phantom
Terra
Maduin
Talk to the western NPC at the top of the stairs.
Go back through the double doors.
Go west and into the door on the ground floor.
Get both chests for a Back Guard and an X-Potion.
Exit this room, then go up the stairs and into the room on this floor.
Talk to all of the soldiers (should be 15 people at the end of this room).
Encounter
Locke
Steal
Terra
Fire
Locke
Bolt
Open the chest for a Tincture.
Exit north.
Talk to the soldier and use the previous strategy for the fight.
Exit, then exit south. Go up the stairs and enter the room.
Go north and talk to the NPC.
Exit west.
Talk to the soldier in the northwest, then talk to the MagiTek soldier outside the door you just exited through.
Go east past the stairs and talk to the MagiTek soldier.
Go up the stairs and talk to both MagiTek soldiers.
Go north and talk to the NPC. Use the previous fight strategy.
You should have talked to 21 people now.
Menu
TODOThe banquet will now begin. Choose the following responses.
| 1 | Option 3 | To our hometowns |
| 2 | Option 1 | Leave him in jail |
| 3 | Option 2 | That was inexcusable |
| 4 | Option 2 | C is one of us! |
| 5 | Option 1 | Why'd you start the war? |
| 6 | Option 1 | One more question please! |
| 7 | Option 2 | Why do you want peace now? |
| 8 | Option 2 | Let's talk about Espers... |
| 9 | Option 1 | Yes, the Espers have gone too far. |
| 10 | Option 1 | Why'd you start the war? |
| 11 | Option 1 | Yes, let's take a break. |
Head to the northeastern NPC at the table and talk for a battle.
Encounter
Terra
Maduin
Return to your seat and continue.
| 12 | Option 2 | That your war's truly over. |
| 13 | Option 1 | Yes |
Exit south when you regain control.
Continue south until an NPC stops you and gives you items.